


In DRF We can use the permissions to implement RBAC (Role-Based Access Control). Role-Based Access Control is an approach that restricts access to users based on their role. You can use Django’s authentication and authorization features to configure Role-Based Access Control.
Django user authentication has built-in models like User, Group, and Permission.
- User: The heart of authentication
- Group: Way of categorizing User
- Permission: Granular access control
This article will not be focused on the Permission model but will cover some basics on how to write some custom permission for specific groups of users. Group-based permission is one of the different methods for implementing permissions in Django. At the end of this article, I believe, you’ll have a basic concept of custom permission in Django.
Let’s start the example with some project setup
$ cd ~/Desktop # your preferred working directory
$ virtualenv -p python3 venv
$ source venv/bin/activate #activating the virtual environment
$ pip install django
$ pip install djangorestframework
$ django-admin.py startproject django_rest_permission
$ cd django_rest_permission #directory changed inside main project
$ python manage.py startapp user #custom user app
All set for the initial project setup, now time to add a model for the project.
from django.db import models
from django.contrib.auth.models import AbstractUser, Group

class User(AbstractUser):
    groups = models.ForeignKey(Group, on_delete=models.CASCADE)
    email = models.EmailField(max_length=50, unique=True)

    REQUIRED_FIELDS = ['groups_id', 'email']

    class Meta:
        verbose_name = 'user'
        verbose_name_plural = 'users'

    def get_full_name(self):
        return '%s %s' % (self.first_name, self.last_name)

    def get_short_name(self):
        return self.first_name

    def __str__(self):
        return self.username
We need to do little change in the setting of the project
INSTALLED_APPS = [
.....
'rest_framework',  #add this line
'rest_framework.authtoken',  # add this line
'user'  # add this line
]
.....
AUTH_USER_MODEL = 'user.User'  # add this line
.....
There will be two types of user groups, ‘admin’ and ‘anonymous’. Let’s first add the groups programmatically and then do the migrations. All groups for our project are manipulated using the following ‘group.py’ file. ‘group.py’ file will be placed in the project level directory.
import os

os.environ.setdefault('DJANGO_SETTINGS_MODULE', 'django_rest_permission.settings')

import django

django.setup()
from django.contrib.auth.models import Group


GROUPS = ['admin', 'anonymous']
MODELS = ['user']

for group in GROUPS:
    new_group, created = Group.objects.get_or_create(name=group)
Now time to make migrations and migrate
python manage.py makemigrations
python manage.py migrate
python group.py
python manage.py createsuperuser  #provide groups.id = 1
Time to add serializer for our User model
from rest_framework.serializers import ModelSerializer
from user.models import User

class UserSerializer(ModelSerializer):
    class Meta:
        fields = ('id', 'first_name', 'last_name', 'username', 'password', 'groups', 'email')
        model = User
        extra_kwargs = {'password': {'write_only': True}}

    def create(self, validated_data):
        user = User.objects.create(**validated_data)
        user.set_password(validated_data['password'])
        user.is_staff = True
        user.save()

        return user
Before jumping directly into the views, we will define some permissions in a ‘permission.py’ inside the user app.
from django.contrib.auth.models import Group
from rest_framework import permissions

def _is_in_group(user, group_name):
    """
    Takes a user and a group name, and returns `True` if the user is in that group.
    """
    try:
        return Group.objects.get(name=group_name).user_set.filter(id=user.id).exists()
    except Group.DoesNotExist:
        return None

def _has_group_permission(user, required_groups):
    return any([_is_in_group(user, group_name) for group_name in required_groups])

class IsLoggedInUserOrAdmin(permissions.BasePermission):
    # group_name for super admin
    required_groups = ['admin']

    def has_object_permission(self, request, view, obj):
        has_group_permission = _has_group_permission(request.user, self.required_groups)
        if self.required_groups is None:
            return False
        return obj == request.user or has_group_permission

class IsAdminUser(permissions.BasePermission):
    # group_name for super admin
    required_groups = ['admin']

    def has_permission(self, request, view):
        has_group_permission = _has_group_permission(request.user, self.required_groups)
        return request.user and has_group_permission

    def has_object_permission(self, request, view, obj):
        has_group_permission = _has_group_permission(request.user, self.required_groups)
        return request.user and has_group_permission

class IsAdminOrAnonymousUser(permissions.BasePermission):
    required_groups = ['admin', 'anonymous']

    def has_permission(self, request, view):
        has_group_permission = _has_group_permission(request.user, self.required_groups)
        return request.user and has_group_permission
Here we are creating the custom permission class without using any third-party packages.
has_permission(self, request, view) and has_object_permission(self, request, view, obj) methods are two methods defined inside Django’s permission class. has_permission() is for the user-level permission while the has_object_permission() is object-level permission. According to the condition we write inside, these two methods will return boolean (true or false). True means the access is allowed otherwise access denied.
In an example of the permission class above, we check the user group and return true or false. We can create permission classes as many as our requirements. Check on official documentation .
Now time to see how these permission classes can be associated with a specific view.
from rest_framework import status
from rest_framework.authentication import TokenAuthentication
from rest_framework.authtoken.serializers import AuthTokenSerializer
from rest_framework.authtoken.views import ObtainAuthToken
from rest_framework.response import Response
from rest_framework.views import APIView
from rest_framework.viewsets import ViewSet, ModelViewSet
from rest_framework.permissions import AllowAny
from user.permission import IsAdminUser, IsLoggedInUserOrAdmin, IsAdminOrAnonymousUser
from user.models import User
from user.serializers import UserSerializer

class UserViewSet(ModelViewSet):
    queryset = User.objects.all()
    serializer_class = UserSerializer
    authentication_classes = [TokenAuthentication]

    def get_permissions(self):
        permission_classes = []
        if self.action == 'create':
            permission_classes = [IsAdminUser]
        elif self.action == 'list':
            permission_classes = [IsAdminOrAnonymousUser]
        elif self.action == 'retrieve' or self.action == 'update' or self.action == 'partial_update':
            permission_classes = [IsLoggedInUserOrAdmin]
        elif self.action == 'destroy':
            permission_classes = [IsLoggedInUserOrAdmin]
        return [permission() for permission in permission_classes]

class LoginView(ViewSet):
    serializer_class = AuthTokenSerializer

    def create(request):
        return ObtainAuthToken().post(request)

class LogoutView(APIView):
    def get(self, request, format=None):
        request.user.auth_token.delete()
        return Response(status=status.HTTP_200_OK)
Let’s configure URLs to our API endpoint. Remember the following urls.py file needs to be inside our user app.
from rest_framework.routers import DefaultRouter
from django.urls import path, include

from user import views

router = DefaultRouter()
router.register('users', views.UserViewSet, base_name='user-list')
router.register('login', views.LoginView, base_name='login')

urlpatterns = [
    path('', include(router.urls)),
    path('account/logout/', views.LogoutView.as_view(), name='logout')
]
At last, we need to add the project-level URL.
from django.contrib import admin
from django.urls import path, include

urlpatterns = [
    path('admin/', admin.site.urls),
    path('api/', include('user.urls'))
]
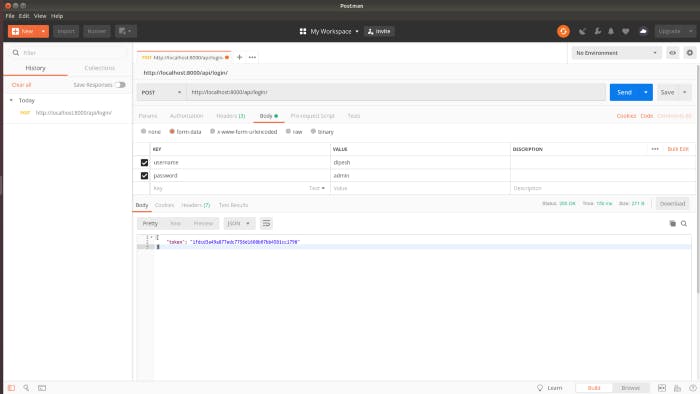
Generating token is not the main theme of this article but you can post the data as shown in the picture below.
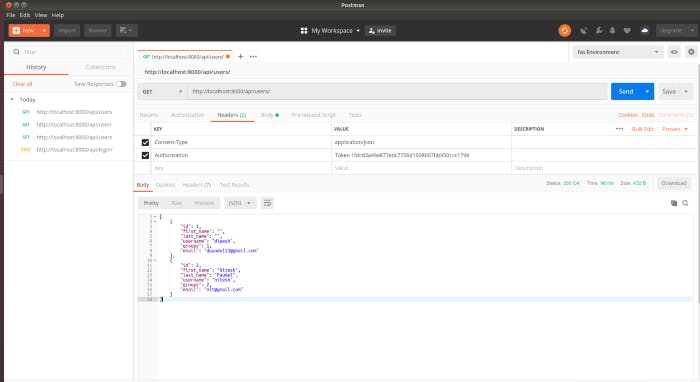
You can use the ‘token’ from the above response and add it in the HTTP request header as shown in the picture below.
The user in a group can have the following role:
Admin group user can
- Login
- Add a new user
- List all users
- View individual user
- Delete users
- Update all users
Anonymous group user can
- Login
- List all users
- View and Update own detail
Without login, no user can get access to the system.
There are other ways that we can implement RBAC. I have done this by doing some research over the internet. Any review of this approach will be highly appreciated.
You can find the Github Repository link to this example article here.